Tuesday, December 31, 2013

Nail Art: Ombre Sparkles

I don't know if any of you have seen it before, or how new it is, but I'm absolutely loving the sparkle-at-the-top-of-the-nails look. My mom came back from the nail salon a few weeks ago and had it done, and I just thought it was so pretty.

You can do it with any colour base polish (dark, light, nude, etc.) and any colour sparkles. The sparkles start off heavier and thicker at the tip of your nail, and then get a lighter as they make their way to about the middle of your nail. This design can also be done in reverse, so that the heavier sparkles are down by your nail bed, and the base polish can be seen clearly at the tip. It's sort of like an ombre french manicure, but with sparkles!

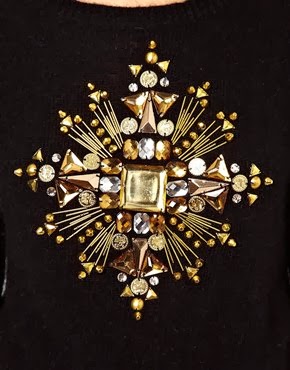
Here's some examples I found on Wanelo (top) and Tumblr (bottom). I love the combination of the simple clear base polish used on the one on the top, and the colourful sparkles. And the really nice taupe-ish colour with the gold sparkles on the bottom. You can use small or large sparkles, too.


It's the perfect way to add some shine and sparkle to your outfit, and perfect for the last of those holiday parties. Happy new year everyone!

Tuesday, December 24, 2013

We Heart The Holidays

Happy holidays everyone!!! I hope you all are having an amazing holiday season, spending time with family and friends, partying, and drinking lots of peppermint flavoured everything!

Here are some things to keep you inspired over the holidays! All pictures are from We Heart It.


Thursday, December 19, 2013

Holiday Parties

One of my favourite things about the holidays is that everything sparkles. Yes I love the candy cane hot chocolates and sitting in front of the fire in my coziest PJs. But as a girl who loves to dress up for just about anything, it's great to actually have something to dress up for. I'm not really at the point in my life yet where I'm attending holiday parties; my work party is pretty casual and, being Jewish, my family doesn't go to any Christmas parties. But even just being able to see all the holiday looks in stores, online and on blogs and feeling the glitz around me is inspiring. 

You can never go wrong with metallic or sequins for the holidays. Both of these styles are classic and pretty, and you can have so much fun with them. I'm loving this sequin skirt from Bebe. It's great because it incorporates both of these styles: it's made of sequins, but still gives off a great metallic look. It's also a neutral colour so you can pair with any colour. Wear it with a black top and pumps if you want to stay feminine and simple, or bright pink if you're not afraid to stand out. Here's a darker sequin option from ASOS.


If you want to be more with the current trends of the season, though, try one of 2013's hottest holiday looks: the tuxedo. It's sexy, functional, and can be worn over and over again with different looks. Pair the jacket with a trousers or skirt for work, or pair the pant with a different top for a night out with the girls. Or try a more modern take: the jumpsuit tuxedo. Try one with a deep V if you're feeling risqué, like Gwyneth Paltrow, whose had the trend nailed since 2012. Add a statement necklace or blazer for warmth.


Another trend for this holiday season is monochromatic colour schemes. Whether red, black, silver or gold, there is so much fun you can have with your one chosen colour, and still look super chic. See below how Sydne Summer from Sydne Style incorporates both the tuxedo and monochrome trends.


Another trend I'm loving for this holiday season is feathers. You can find them almost anywhere right now; on a skirt, on a shirt, on a purse, on a necklace. If you don't want to go overboard, make your feather piece your statement piece, and keep the rest of your outfit monochromatic and simple. These pieces are from Bebe (left) and Club Monaco (right).


Want something comfortable on your feet for all of those holiday parties (if you're hosting, let's say)? Don't feel like you need to give up style and trend for comfort; swap out your heels pair for these metallic gold slippers from Club Monaco. The neutral metallic guarantees they'll match with almost any outfit, and you're feet definitely won't be killing you later.


Bonus tip: Don't limit your glamorous holiday looks to strictly indoor apparel; for example if you're going to be ringing in the new year outside in a town square (like me), you'll want to look amazing even in all those layers. Try a stylish coat (fur is always good), and instead of a hat, try ear muffs. They keep your ears warm while also not giving you hat hair when you take them off indoors!

What do you have planned for the holidays (outfit and activity wise)?!

Sunday, December 15, 2013

Sweater Weather 2.0

Sweaters are a basic staple; they keep you warm, come in many different fabrics, prints and colours, and you know they'll always be in style for fall/winter. But this season, they have a new and exciting spin to them.

It's almost impossible to walk into a store now and not see some sort of rhinestone, jewel or other embellishment on cold weather's best friend. It's such a great contrast between the chunky, casual material and the dressy, fun accents.

The sweater has come so far that it could even be worn for a night out. And if you pair it perfectly, dare I say, you could even wear one to a holiday party this year? Especially a classic black, fitted sweater, perhaps paired with leather trousers and a statement shoe?

If you want to ease into the trend, you might want to try something like these necklace sweaters from Joe Fresh (left) or ASOS (right). You could either be wearing the embellished sweater trend, or not, and no one will know until they see your back (where the necklace part doesn't reach).


You could start off small, like with this sweater from Zara. The rhinestones blend in a bit with the grey, but stand out just enough to give the top a little something.


If you wanted to go a bit further, try something like this bejewelled striped sweater from Tory Burch. The pattern is classic and simple, making the top look stylish and not too crazy, even with all the jewels.

If you wanted to jump right into the trend and are not afraid to stand out, this Top Shop piece is probably more what you're looking for. The colourful sequins allow you to pair the top with just about any colour, and because it's knitted, you could wear it in fall, winter or spring.


Here are just some other great embellished sweaters from ASOS I wanted to share with you!


Wednesday, December 11, 2013

The Final Frontier

As a lover, reader, and watcher of almost anything sci fi, I am absolutely fascinated by space. Many of the shows and movies I love (Doctor Who, Firefly, Star Trek, Star Wars) feature space and so I've actually learned a lot about it, which has just furthered my interest. I always complain to my sister how much I want to go to space but she says I'm  not smart enough to become an astronaut. I keep telling her one day there will be commercial flights to outer space and that I will be on one. 

So I was so excited to hear that the first commercial space flight will actually be a lot closer than I thought, taking flight just next year! Here is a quote from the University Herald article from September, which you can read here: "The SS2 is designed to take six passengers into suborbital space, an altitude of about 361,000 feet. Those on board will be able to see the curvature of the Earth and the deep dark blackness of space. So far, about 580 people have put down deposits to take the ride."

A ticket for a seat on the flight is only $250,000 (I say only sarcastically), which I will not be able to afford for a very very long while. But it's definitely still good to know that when I can, space will be waiting! 

The fashion industry has also been taking a cue from outer space as of late, with lots of galaxy-patterned merch. Here are some of my favourite space-inspired trends! PS. How beautiful is space???


                          Paper Blog                                         Top Shop

 
                            Luuux                                               Vivienne Westwood


                              Cichic                                                      Tokara


Zechia        


Wednesday, December 4, 2013

DIY: Magazine Holder

I never thought I'd do a DIY post, nor do I usually do DIY (I'm not that creative), but I just had so much fun with this, I knew I had to share it with you. 

I have proper magazine holders that I bought from Wal-Mart a million years ago; they're the perfect size for the amount of magazines I typically have on hand at one time and they sit nicely on my desk. But for a few of my classes this year my professors have asked us to keep old magazines on hand to cut out pictures for projects, and so I started saving magazines once I was done reading them, and they started piling up fast and I had nowhere to keep them. 


I had bought a hair styling equipment holder from Bed Bath & Beyond that houses my hair dryer, curler and straightener, and I have to say it's been a handy addition to my dresser. There's also a hook so you can hang it on your bathroom door or towel rack (photo below). I held onto the box it came in for a while, since it was a great size and I thought I'd be able to find something useful to use it for. Turns out I did.


Getting Started
Of course you can use any size box you want (I just happen to have this one on hand and it was the perfect size), but make sure it's sturdy and big enough to hold all your magazines. Choose a paint colour that goes with your room, or wherever you plan on keeping your magazine holder. It doesn't need to match your wall colour or bedding/furniture perfectly, it can just be a colour that goes nicely with your decor. I actually mixed a lavender with white, black and a bit of blue. I also had to keep mixing in different amounts of each colour before I found the hue I wanted. My sister is very artsy and always has paint in the house so I just used what was here, but you could go to any art store in your area and just grab whatever colours you want. I personally love Michael's, but Curry's also has a good selection and is more cost efficient.


Before you start painting, cut off the top of the box so your magazines can stick out a bit if they need to (the box I used just happened to be shorter than the magazines). I used 3 coats of paint on mine, since the paint colour is kind of light and I needed to cover the picture on the box. If you're using a darker colour, you should only need about 2 coats, but feel free to do as many as you want to get the perfect colour.


After letting the paint dry for about 24 hours (not necessary but I needed a break!), I stuck on these jewels from Michael's with a glue gun (I tried to find some that were already sticky on the back, but no such luck). 


The set came with different shapes and sizes, and some were just silver while some had a bit of colour to them, so I played around with them until I decided on a pattern I liked. I chose to do smaller jewels on the top and larger ones on the bottom, since I felt it balanced the weight of the different sizes nicely.


And there you have my first (and possibly not only) DIY creation. Try it yourself for somewhere chic and unique to keep your magazines!